In my previous post, I have written about a web application that uses Amazon Polly to notify
users with a natural speech when their cards are sold.
In this post, I will show how to use Amazon Lex for
creating a web application that enables users to use their native speech to command
the application.
Amazon Lex
provides conversational text and voice interfaces powered by the same deep
learning technologies as Amazon Alexa. Using Lex, we can create bots and applications that understands text and
speech commands.
I will use the application that is developed in my previous post as a starting point, which can be found in my GitHub repository.
The sample application will use an Amazon Lex bot to
allow users to execute commands like add a card, show my cards, sell a card and
log out. The application will record audio in the browser and send the audio to
Lex for processing. The Lex bot will process the audio input and respond with
an audio message and the audio will be played in the browser. When a command is
understood, the application will execute the command in the web app. The flow
is shown in the picture below.

The steps to develop the application are below.
1. Create the Amazon Lex bot
2. Test the bot
3. Create the Amazon Lex client
4. Create the SpeechController
5. Change the dashboard to interact with audio commands
Let's start.
1. Create
the Amazon Lex Bot
To create the bot, login to the Amazon Management Console and select Lex. Please note that Lex is currently only
available in N. Virginia region.
For more information on creating a custom Lex bot, see Exercise 2: Create a Custom Amazon Lex Bot on Lex documentation.
Click Get Started
to start. Click Custom Bot and enter CardStore as Bot Name. Select Output
voice that you want. I will use Joanna for this post. Enter Session
timeout. Select No for COPPA section and
click Create to create your bot.

Your bot will be created like the picture below without
no intents. Intents will be used to execute different commands in our application.

Click Create Intent
to create first intent. Our first intent will be LogOut intent. This intent will be used to log out from the web application.

In the popup window click Create new intent and enter LogOut as intent name.

Click Add and LogOut intent will be created like below.

Enter "I want
to log out" in the Sample
utterances section and click + icon. Repeat the step for "I would like to log out". In the Confirmation prompt section click Confirmation prompt and enter "Are you sure you want to log out?"
in the Confirm text box and "Okay.
You are staying" in the Cancel text box.
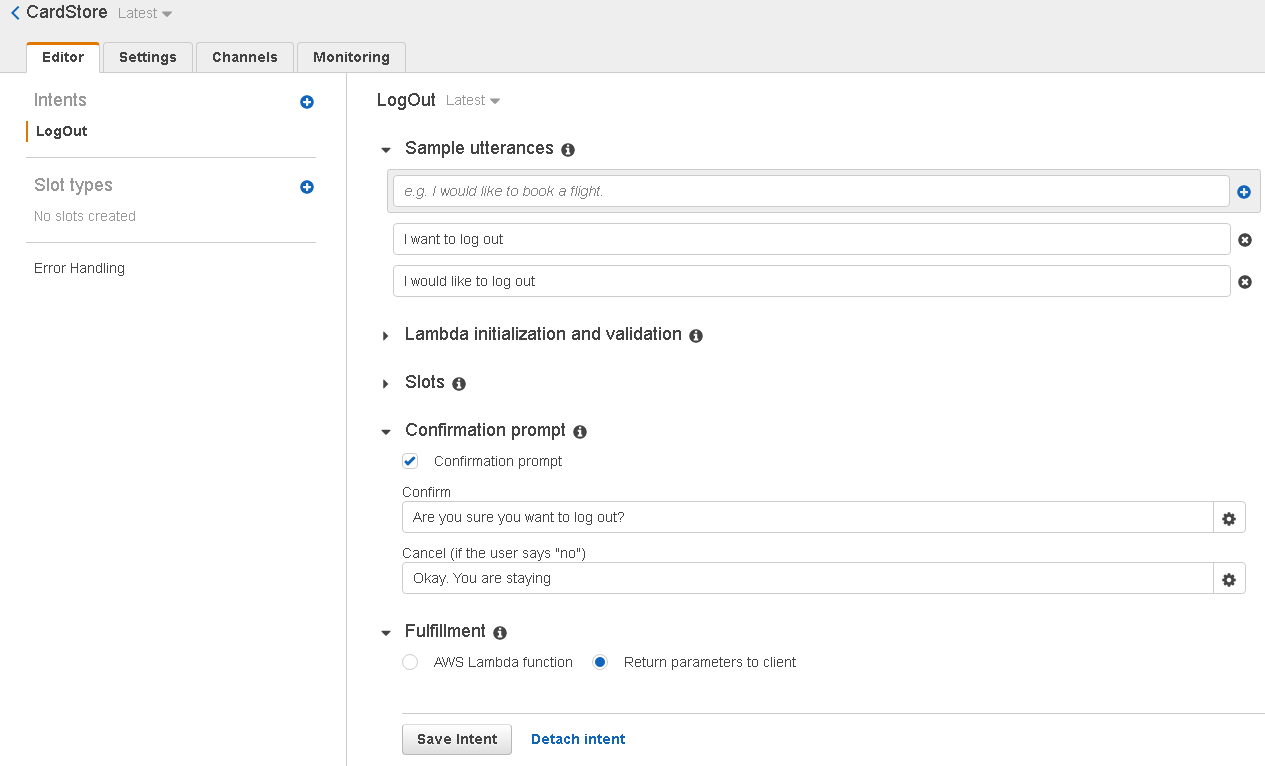
Click Save Intent to
save LogOut intent.
Click + icon near the Intents section to add AddCard
intent. Enter "I want to add a card"
and "I would like to add a card"
utterances and click Save Intent to
save AddCard intent.

Repeat the same steps for ShowMyCards intent and enter "I want to see my cards" and "I would like to see my cards" for Sample utterances.

The last intent we will add is SellACard intent. This
intent will be used for selling a card. Selling a card requires two values to
be entered: card name and card price. In Lex, we use slots to represent values
that are entered by user. For card price slot we will use built-in
AMAZON.NUMBER slot type but for card name we will use a custom slot type.
To create CardName custom slot type, click + icon right
to Slot types. Enter CardName as Slot type name and "Name of the
card" as Description and enter some values like below and click Save slot type.

Create the SellACard intent and enter "I want to sell a card" and "I would like to sell a card" for Sample utterances.
In the Slots section enter CardName as Name and select CardName from Slot type combo. Enter "Which card?" as Prompt and click +
icon to add CardName slot.

To create CardPrice slot, select Required check box, enter
CardPrice as Name and select
AMAZON.NUMBER from Slot type combo. Enter "At what price?" as Prompt and click + icon.

We should add a confirmation prompt to prevent
accidentally selling a card for the SellACard intent. In the Confirmation
prompt section, click Confirmation prompt and enter "Are you sure you want to sell your card, '{CardName}', for {CardPrice}$
?" at the Confirm text box and "Okay. Your card will stay with you" at the Cancel text box.
Click Save Intent to save SellACard intent.

Now, our bot CardStore is ready to be build and to test.
Click Build at the top right to build
the bot. It will take some time to build the bot. After the bot is built you
can test the bot.
2. Test
the Bot
To test the bot, click blue Test Bot button at the bottom
right. You can test the bot by entering commands to chat window and also by
your speech after clicking the mic icon. If the bot is not understands you, you
can refresh the browser page and try again.
More than one intent can be processed by one bot. Lex
uses sample utterances to decide intents. After the intent is determined, Lex
tries to get slots one by one, if there is any. After all the slots are
received, Lex asks for confirmation prompt and if user says 'Yes', the intent
is ready to be fullfilled and values of the slots are written like the picture
below.

Normally, the client is expected to fulfill the intent
with the specified values of the slots. Lex allows a Lambda function to be
executed for fullfilment, but for simplicity in this post I won't use Lambda
functions.
Also Lex allows a specific Lambda function to be used for
slot validation. This can be very useful for validating complex slot values.
3.
Create the Amazon Lex client
Add Maven dependency for Amazon Lex SDK.
<dependency>
<groupId>com.amazonaws</groupId>
<artifactId>aws-java-sdk-lex</artifactId>
<version>1.11.119</version>
</dependency>
Please note that, to use 1.11.119 version of the AWS Java
SDK for Lex, please also set the same version for the other AWS Java SDK
dependencies like DynamoDB, Polly, etc.
Add com.cardstore.lex.LexClient
like below. This client will be used to access the Lex
bot. post method
will be used to post the audio input recorded to the Lex bot. LexPostResult class
will hold the conversation data that the Lex bot returns.
package com.cardstore.lex;
import java.io.ByteArrayInputStream;
import java.io.ByteArrayOutputStream;
import java.io.InputStream;
import org.springframework.util.StreamUtils;
import com.amazonaws.regions.Region;
import
com.amazonaws.services.lexruntime.AmazonLexRuntime;
import com.amazonaws.services.lexruntime.AmazonLexRuntimeClient;
import
com.amazonaws.services.lexruntime.AmazonLexRuntimeClientBuilder;
import
com.amazonaws.services.lexruntime.model.PostContentRequest;
import
com.amazonaws.services.lexruntime.model.PostContentResult;
public class LexClient {
private final AmazonLexRuntime lex;
private final String botName;
private final String botAlias;
private final String username;
public LexClient(Region region, String botName, String botAlias, String username) {
this.botName = botName;
this.botAlias = botAlias;
this.username = username;
AmazonLexRuntimeClientBuilder builder = AmazonLexRuntimeClient.builder();
builder.setRegion(region.getName());
lex = builder.build();
}
public LexPostResult post(String contentType, byte[] audio, String accept) throws Exception {
PostContentRequest req = new PostContentRequest();
req.setBotName(botName);
req.setBotAlias(botAlias);
req.setUserId(username);
req.setAccept(accept);
req.setContentType(contentType);
InputStream is = new ByteArrayInputStream(audio);
req.setInputStream(is);
PostContentResult ret = lex.postContent(req);
ByteArrayOutputStream baos = new ByteArrayOutputStream();
StreamUtils.copy(ret.getAudioStream(), baos);
LexPostResult res = new LexPostResult(ret.getIntentName(), ret.getDialogState(), ret.getSlots(), ret.getSlotToElicit(), ret.getSessionAttributes(), baos.toByteArray(), ret.getInputTranscript(), ret.getMessage());
return res;
}
}
The code for LexPostResult
class is below. This class will hold conversation data
like the intent name that is determined, dialog state, next slot to elicit,
determined slot values and a message in text and audio format.
package com.cardstore.lex;
import java.util.HashMap;
import java.util.Map;
import
com.fasterxml.jackson.core.type.TypeReference;
import com.fasterxml.jackson.databind.ObjectMapper;
public class LexPostResult {
private String intentName;
private String dialogState;
private Map<String, String> slots;
private String slotToElicit;
private Map<String, String> sessionAttributes;
private byte[] audio;
private String inputText;
private String responseText;
public LexPostResult(String intentName, String dialogState, String slots, String slotToElicit,
String sessionAttributes, byte[] audio, String inputText, String responseText) throws Exception {
super();
this.intentName = intentName;
this.dialogState = dialogState;
this.slots = stringToMap(slots);
this.slotToElicit = slotToElicit;
this.sessionAttributes = stringToMap(sessionAttributes);
this.audio = audio;
this.inputText = inputText;
this.responseText = responseText;
}
private Map<String, String> stringToMap(String jsonStr) throws Exception {
Map<String, String> map = new HashMap<String, String>();
if (jsonStr != null) {
ObjectMapper mapper = new ObjectMapper();
// convert JSON string to Map
map = mapper.readValue(jsonStr, new TypeReference<Map<String, String>>(){});
}
return map;
}
public String getIntentName() {
return intentName;
}
public String getDialogState() {
return dialogState;
}
public Map<String, String> getSlots() {
return slots;
}
public String getSlotToElicit() {
return slotToElicit;
}
public Map<String, String> getSessionAttributes() {
return sessionAttributes;
}
public byte[] getAudio() {
return audio;
}
public String getInputText() {
return inputText;
}
public String getResponseText() {
return responseText;
}
}
4.
Create the SpeechController
After creating the Lex client, we can use the client to
send the audio recorded in the browser to the Lex bot. The code for SpeechController class
is below.
The PCM audio format will be used with sample rate of
16K. The result of the Lex postContent request will be in audio/mpeg
format that will be played at the browser.
createSpeechResultFromLexPostResult
method will map the returned intent names to the commands that will be used in
the browser like ADD_CARD, SHOW_MY_CARDS, SELL_CARD, LOGOUT .
initLexClient method
will be used to init Lex client when a user is logged in and a session is
created. The same Lex client will be used during the whole session. After the
response audio is returned, it will be put in the session and when the browser
requests the audio it will be returned from the session.
package com.cardstore.controller;
import java.io.ByteArrayOutputStream;
import java.io.IOException;
import java.io.InputStream;
import javax.servlet.http.HttpSession;
import org.springframework.stereotype.Controller;
import org.springframework.util.StreamUtils;
import
org.springframework.web.bind.annotation.RequestMapping;
import
org.springframework.web.bind.annotation.ResponseBody;
import com.amazonaws.regions.Region;
import com.amazonaws.regions.Regions;
import com.cardstore.entity.User;
import com.cardstore.lex.LexClient;
import com.cardstore.lex.LexPostResult;
@Controller
public class SpeechController {
private static final String CONTENT_TYPE = "audio/x-l16; sample-rate=16000;
channel-count=1";
private static final String ACCEPT = "audio/mpeg";
private static final String USER_LEX_CLIENT_KEY = "USER_LEX_CLIENT_KEY";
private static final String USER_SPEECH_RESPONSE_AUDIO_KEY = "USER_SPEECH_RESPONSE_AUDIO_KEY";
@RequestMapping(path="/speech")
@ResponseBody
public SpeechResult speechCommand(InputStream requestBodyStream, HttpSession session) throws Exception {
SpeechResult res = null;
User user = UserController.userfromSession(session);
if (user != null) {
LexClient client = getLextClientFromSession(session);
ByteArrayOutputStream baos = new ByteArrayOutputStream();
StreamUtils.copy(requestBodyStream, baos);
byte[] audio = baos.toByteArray();
LexPostResult ret = client.post(CONTENT_TYPE, audio, ACCEPT);
res = createSpeechResultFromLexPostResult(ret);
putSpeechResponseAudioIntoSession(session, ret.getAudio());
}
return res;
}
private SpeechResult createSpeechResultFromLexPostResult(LexPostResult ret) {
SpeechResult res = new SpeechResult();
res.setCommand(SpeechResult.SPEECH_COMMAND.UNKNOWN);
res.setInputText(ret.getInputText());
res.setResponseText(ret.getResponseText());
if (ret.getDialogState().equals("ReadyForFulfillment")) {
if (ret.getIntentName().equals("LogOut"))
res.setCommand(SpeechResult.SPEECH_COMMAND.LOGOUT);
else if (ret.getIntentName().equals("AddCard")) {
res.setCommand(SpeechResult.SPEECH_COMMAND.ADD_CARD);
}
else if (ret.getIntentName().equals("ShowMyCards")) {
res.setCommand(SpeechResult.SPEECH_COMMAND.SHOW_MY_CARDS);
}
else if (ret.getIntentName().equals("SellACard")) {
res.setCommand(SpeechResult.SPEECH_COMMAND.SELL_CARD);
res.setCardName(ret.getSlots().get("CardName"));
res.setCardPrice(ret.getSlots().get("CardPrice"));
}
}
return res;
}
@RequestMapping(path="/speechResponseAudio", produces="audio/mpeg3")
public @ResponseBody byte[] speechResponseAudio(HttpSession session) throws IOException {
return getSpeechResponseAudioFromSession(session);
}
public static LexClient
getLextClientFromSession(HttpSession session) {
return (LexClient)session.getAttribute(USER_LEX_CLIENT_KEY);
}
public static void putLexClientIntoSession(HttpSession session, LexClient client) {
session.setAttribute(USER_LEX_CLIENT_KEY, client);
}
public static byte[]
getSpeechResponseAudioFromSession(HttpSession session) {
return (byte[])session.getAttribute(USER_SPEECH_RESPONSE_AUDIO_KEY);
}
public static void
putSpeechResponseAudioIntoSession(HttpSession session, byte[] audio) {
session.setAttribute(USER_SPEECH_RESPONSE_AUDIO_KEY, audio);
}
public static void initLexClient(HttpSession session, String sessionId) {
LexClient client = new LexClient(Region.getRegion(Regions.US_EAST_1), "CardStore", "$LATEST", sessionId);
putLexClientIntoSession(session, client);
}
}
The code for SpeechResult
class is below.
package com.cardstore.controller;
public class SpeechResult {
public enum SPEECH_COMMAND { UNKNOWN, ADD_CARD, SHOW_MY_CARDS, SELL_CARD, LOGOUT };
SpeechResult.SPEECH_COMMAND command;
String cardName;
String cardPrice;
String inputText;
String responseText;
public SpeechResult.SPEECH_COMMAND getCommand() {
return command;
}
public void
setCommand(SpeechResult.SPEECH_COMMAND command) {
this.command = command;
}
public String getCardName() {
return cardName;
}
public void setCardName(String cardName) {
this.cardName = cardName;
}
public String getCardPrice() {
return cardPrice;
}
public void setCardPrice(String cardPrice) {
this.cardPrice = cardPrice;
}
public String getInputText() {
return inputText;
}
public void setInputText(String inputText) {
this.inputText = inputText;
}
public String getResponseText() {
return responseText;
}
public void setResponseText(String responseText) {
this.responseText = responseText;
}
}
Add the highlighted line below to login method of
UserController class to initialize Lex client when a used is logged in.
@RequestMapping(value = "/login", method = RequestMethod.POST, produces = "text/plain")
@ResponseBody
public String login(@RequestBody User user, HttpServletRequest request) {
String error = "None";
User existing = userRepository.findOne(user.getUsername());
boolean canLogin = existing != null && existing.getPassword().equals(user.getPassword());
if (!canLogin)
error = "User name and password mismatch.";
else if (!existing.getActivationStatus().equals(User.ACTIVATION_STATUS_DONE))
error = "User is not activated.";
else {
HttpSession session = request.getSession(true);
session.setAttribute(USER_KEY_FOR_SESSION, existing);
SpeechController.initLexClient(session, session.getId());
}
return error;
}
Now, the bot and the server side code is ready to be used
from client side. We can use the server code from the web app.
5.
Change the dashboard to interact with audio commands
In the dashboard, we will create a chat window just like
the Lex Test Bot chat window. Conversations will be shown here.
Then, we will implement audio recording. We will record
the audio using the MediaRecorder of the Web Audio API.
After the audio is recorded for 4 seconds, first we will down sample the
recorded audio to 16 kHz. Then we will remove the silence from recorded audio. If
there is no non-silence audio left, we won't send it to Lex. The last thing we
will do before sending the audio is converting from float audio data to 16 bit
integer audio data. After the conversion data is sent to Lex.
The server code will send the audio that is recorded in
the browser to Amazon Lex. Lex will process the audio input and will return a
prompt in the audio form. The audio will be put in session and will be request
by the browser to play. When an intent is ready for fulfillment, the server code
will decide the command to invoke in the browser. The browser will execute the
requested command and a notification message will be played by generating a
speech with Amazon Polly.
We will start with replacing the code below in the
original dahsboard.jsp
function initNotifications() {
if (typeof (EventSource) !== "undefined") {
var source = new EventSource("/feed");
source.addEventListener('cardSold', function(event) {
var data = JSON.parse(event.data);
processCardSoldEvent(data);
});
}
}
</script>
</head>
<body onload="initNotifications()">
<div id="notif-container">
with the code below.
var speechRecorder = {};
function playAudioFromUrl(url, finishHandler) {
setSpeechStatus('Speaking...');
var audio = new Audio(url);
audio.onended = function() {
if (finishHandler)
finishHandler();
}
audio.play();
}
function stopRecording() {
speechRecorder.recorder.stop();
}
function startRecording() {
setSpeechStatus('Listening...');
speechRecorder.recorder.start();
setTimeout(stopRecording, 4000);
}
function handleLexResponse(speechRes) {
if (speechRes.command == 'LOGOUT') {
playChatResponse('Okay. You are logging out, good bye.', function() {
logout();
});
return;
}
replaceChatAudioInputLine(speechRes.inputText);
if (speechRes.command == 'UNKNOWN') {
addChatBotResponse(speechRes.responseText);
playAudioFromUrl('speechResponseAudio', startRecording);
}
else {
if (speechRes.command == 'ADD_CARD') {
playChatResponse('Okay. You can add your card using this form.', function() {
addCardClicked();
startRecording();
});
}
else if (speechRes.command == 'SHOW_MY_CARDS') {
playChatResponse('Okay. Here are your cards.', function() {
listMyCards();
startRecording();
});
}
else if (speechRes.command == 'SELL_CARD')
sellCard(speechRes.cardName, speechRes.cardPrice, function (resultMessage) {
playChatResponse(resultMessage, startRecording);
});
}
}
function sendAudioToLex(audioData) {
setSpeechStatus('Analyzing...');
addChatAudioInputLine();
$.ajax({
type: 'POST',
url: 'speech',
data: audioData,
contentType: false,
cache: false,
processData: false,
success: handleLexResponse,
error: function () {
alert("Can't send audio.");
startRecording();
}
});
}
function reSample(audioBuffer, targetSampleRate, onComplete) {
var channel = audioBuffer.numberOfChannels;
var samples = audioBuffer.length * targetSampleRate / audioBuffer.sampleRate;
var offlineContext = new OfflineAudioContext(channel, samples, targetSampleRate);
var bufferSource = offlineContext.createBufferSource();
bufferSource.buffer = audioBuffer;
bufferSource.connect(offlineContext.destination);
bufferSource.start(0);
offlineContext.startRendering().then(function(renderedBuffer){
onComplete(renderedBuffer);
})
}
var SILENCE_THRESHOLD = 0.04;
function removeSilence(buffer) {
var l = buffer.length;
var nonSilenceStart = 0;
var nonSilenceEnd = l;
while (nonSilenceStart < l) {
if (Math.abs(buffer[nonSilenceStart]) > SILENCE_THRESHOLD)
break;
nonSilenceStart++;
}
while (nonSilenceEnd > nonSilenceStart) {
if (Math.abs(buffer[nonSilenceEnd]) > SILENCE_THRESHOLD)
break;
nonSilenceEnd--;
}
var retBuffer = buffer;
if (nonSilenceStart != 0 || nonSilenceEnd != l) {
retBuffer = buffer.subarray(nonSilenceStart, nonSilenceEnd);
}
return retBuffer;
}
function convertFloat32ToInt16(buffer) {
buffer = removeSilence(buffer);
var l = buffer.length;
var buf = new Int16Array(l);
while (l--) {
buf[l] = Math.min(1, buffer[l]) * 0x7FFF;
}
return buf.buffer;
}
function initSpeechRecording() {
navigator.mediaDevices.getUserMedia({
audio: true
}).then(
function onSuccess(stream) {
var data = [];
speechRecorder.recorder = new MediaRecorder(stream);
speechRecorder.audioContext = new AudioContext();
speechRecorder.recorder.ondataavailable = function(e) {
data.push(e.data);
};
speechRecorder.recorder.onerror = function(e) {
throw e.error || new Error(e.name);
}
speechRecorder.recorder.onstart = function(e) {
data = [];
}
speechRecorder.recorder.onstop = function(e) {
setSpeechStatus('Checking silence...');
var blobData = new Blob(data, {type: 'audio/x-l16'});
var reader = new FileReader();
reader.onload = function() {
speechRecorder.audioContext.decodeAudioData(reader.result, function(buffer) {
reSample(buffer, 16000, function(newBuffer) {
var trimmedBuffer = removeSilence(newBuffer.getChannelData(0));
if (trimmedBuffer.length > 0) // if its not fully silence, send to Lex
sendAudioToLex(convertFloat32ToInt16(trimmedBuffer));
else
startRecording();
});
});
};
reader.readAsArrayBuffer(blobData);
}
});
}
var lastAudioInputId = 0;
function addChatAudioInputLine() {
var row$ = $('<p id="audioInput' + ++lastAudioInputId + '" class="me">Audio input</p>');
$('#chat').append(row$);
$("#chat").scrollTop($("#chat")[0].scrollHeight);
}
function replaceChatAudioInputLine(txt) {
$('#audioInput' + lastAudioInputId).html(txt);
}
function addChatBotResponse(txt) {
var row$ = $('<p class="bot">' + (txt || ' ') + '</p>');
$('#chat').append(row$);
$("#chat").scrollTop($("#chat")[0].scrollHeight);
}
function playChatResponse(txt, callback) {
addChatBotResponse(txt);
playAudioFromUrl('audio?msg=' + txt, callback);
}
function setSpeechStatus(txt) {
$('#speechStatus').html(txt);
}
function initPage() {
initNotifications();
initSpeechRecording();
playChatResponse('Welcome ${user.name}. Your current balance is ${user.balance}$. What would you like to do ?', startRecording);
}
</script>
</head>
<body onload="initPage()">
<div class="chatContainer">
<div id="speechStatus"></div>
<div id="chat" class="chat"></div>
</div>
There are also some another changes related to CSS
styles, but they are not essential. For all changes please compare the old and
new code.
Update:
There are a few required JVM properties to run the application. You should specify the required properties in /src/main/resources/application.properties file like below.
user.activation.queue.name=
mail.from.address=
user.card.upload.s3.bucket.name=
user.card.upload.s3.bucket.region=
user.card.upload.s3.bucket.awsId=
user.card.upload.s3.bucket.awsSecret=
After we complete all the changes, our application should
be ready to try. After you logged in, the welcome message should be played and
the application should start to listen your commands. There is a video below
showing the usage of the application.
Next
Steps
In this post, I have fulfilled the intents in the web
app. In real applications, Lambda functions can be used for slot validation and
fulfillment.
Also for simplicity, audio is recorded for 4 seconds and
if all the recorded data is silence, the audio is not sent to Lex. In real
applications, we can create a
ScriptProcessorNode to
analyze the recorded audio data in real-time and stop the recording if the
silence is detected for a specific duration. For more information, see Web Audio API docs.
For more information on using Lex within a web app, see
this Amazon blog post and
you can find the code here.
Summary
In this post, I have developed an Amazon Lex bot to be
used from a web application and used that bot to control the web app functions.
To read more about AWS AI services, stay tuned.
i am getting this error
ReplyDelete2017-12-06 13:56:59.030 WARN 11812 --- [ restartedMain] ationConfigEmbeddedWebApplicationContext : Exception encountered during context initialization - cancelling refresh attempt: org.springframework.beans.factory.UnsatisfiedDependencyException: Error creating bean with name 'cardController': Unsatisfied dependency expressed through field 'userController'; nested exception is org.springframework.beans.factory.BeanCreationException: Error creating bean with name 'userController': Injection of autowired dependencies failed; nested exception is java.lang.IllegalArgumentException: Could not resolve placeholder 'user.activation.queue.name' in string value "${user.activation.queue.name}"
Hi Johnny,
ReplyDeleteThank you for downloading and running the application.
It seems that I have forgotten to mention JVM properties required to run the app in the post.
You can add the required parameters to /src/main/resources/application.properties file like below.
user.activation.queue.name=
mail.from.address=
user.card.upload.s3.bucket.name=
user.card.upload.s3.bucket.region=
user.card.upload.s3.bucket.awsId=
user.card.upload.s3.bucket.awsSecret=
Please let me know if you run it successfully.
Thanks again for trying.
Regards
Hi Ceyhun,
DeleteThanks for your help.
Now i am not getting this error. i can able to login and see the Home page.
Thanks for you support.
This comment has been removed by the author.
ReplyDelete
ReplyDeleteHi
please let me know how to resole this error:
C:\Users\raghu33>aws iam list-users
An error occurred (AccessDenied) when calling the ListUsers operation: User: arn
:aws:iam::866925837777:user/cardrole is not authorized to perform: iam:ListUsers
on resource: arn:aws:iam::866925837777:user/
Hi, Johnny,
DeleteIt seems that the user you have configured for AWS CLI does not have IAM permission to list users.
You have several options:
1. You can use AWS Console. Go to IAM Service, and give required permissions to user
2. You can configure AWS CLI to use your root user
3. Add the user to administrators group.
NOTE: Please note that 2nd and 3rd options are recommended to try the things quickly
If you use these options, please take the unnecessary permissions from the user and give the only required permmissions.
Also please keep your root credentials private and enable MFA on your root account.
http://docs.aws.amazon.com/IAM/latest/UserGuide/id_credentials_mfa_enable_virtual.html
And IAM Best Practices document should help
http://docs.aws.amazon.com/IAM/latest/UserGuide/best-practices.html
Regards
This comment has been removed by the author.
ReplyDeleteHi,
ReplyDeleteuser.activation.queue.name=
mail.from.address=
user.card.upload.s3.bucket.name=
user.card.upload.s3.bucket.region=
user.card.upload.s3.bucket.awsId=
user.card.upload.s3.bucket.awsSecret=
When I add these credentials in the application properties file. It shows me "com.amazonaws.SdkClientException: Unable to load AWS credentials from any provider in the chain". Please solve this issue for me.
aswell as tell me what credentials to be filled for:
1)user.activation.queue.name
2)user.card.upload.s3.bucket.awsId
3)user.card.upload.s3.bucket.name
Hi,
DeleteIt seems that the error is linked to the AWS CLI configuration.
Please ensure that you have configured your AWS CLI installation properly.
This link might help.
http://docs.aws.amazon.com/sdk-for-java/v1/developer-guide/credentials.html
Regards
Hi,
ReplyDeleteI have started implementing on a project. when I run my project in localhost I am facing error:"Uncaught (in promise) DOMException: Only secure origins are allowed" and voice is not recognizing.
Thanks
nagesh
Hi Ceyhun Özgün,
ReplyDeleteGreat explanations and works like a charm. I was trying to implement this in Spring MVC 4.3.3 but I am not able to get succeed. It shows error Uncaught TypeError: Cannot read property 'start' of null, feed:1 GET http://logicheart.localhost:8080/ZingyCRM/feed net::ERR_INCOMPLETE_CHUNKED_ENCODING
at Java end, SEVERE: Servlet.service() for servlet [spring] in context with path [/ZingyCRM] threw exception [Request processing failed; nested exception is java.lang.IllegalStateException: Async support must be enabled on a servlet and for all filters involved in async request processing. This is done in Java code using the Servlet API or by adding "true" to servlet and filter declarations in web.xml.] with root cause
java.lang.IllegalStateException: Async support must be enabled on a servlet and for all filters involved in async request processing. This is done in Java code using the Servlet API or by adding "true" to servlet and filter declarations in web.xml.
Any thought or help on this one?
Hi,
DeleteYou can enable async support in web.xml, or using a specific bean configuration if you use Spring Boot
This might help https://stackoverflow.com/a/40591038
Regards
This comment has been removed by the author.
ReplyDeleteI am trying add web application to my own LEX app. I have pool ID and IAM credentials for that , I dont have "USER_LEX_CLIENT_KEY" how to deal with all, why don't you upload a VDO on youtube which will be great help..
ReplyDeleteHi Shishir
DeleteUSER_LEX_CLIENT_KEY is an attribute key for storing lex client object in HttpSession thar is created for the user that logged in, it is not an api key for Lex communication.
Regards
your detailed analysis helped me lot in knowing about AWS and its usages and growth..
ReplyDeleteaws training in bangalore
Nice blog, very useful to the users for more information get touch with AWS Online Course
ReplyDeleteYour article is so informative for me. It will really help to others. Thanks a lot.
ReplyDeleteaws classes
aws training in pune
aws classes in pune
i'm Here to Get Great About DevOps, Thanks For Sharing
ReplyDeleteDevOps Training
DevOps Training in Ameerpet
places for lunch in oxford
ReplyDeleteIndian Restaurant Oxford
Good blog information
ReplyDeleteSanjary Kids is one of the best play school and preschool in Hyderabad,India. Give your child the best preschool experience by choosing the best playschool of Hyderabad in Abids. we provide programs like Play group,Nursery,Junior KG,Senior KG,and provides Teacher Training Program.
Preschool in hyderabad
This comment has been removed by the author.
ReplyDeleteExcellent blog information of the topic
ReplyDeleteSanjary Academy is the best Piping Design institute in Hyderabad, Telangana. It is the best Piping design Course in India and we have offer professional Engineering Courses like Piping design Course, QA/QC Course, document controller course, Pressure Vessel Design Course, Welding Inspector Course, Quality Management Course and Safety Officer Course.
Piping Design Course
Piping Design Course in Hyderabad
Piping Design Course in India
This comment has been removed by the author.
ReplyDeleteGreat informative blog and understandable
ReplyDeleteSanjary Academy provide pressure vessel design,quality management system course, piping design course, qa/qc course and document controller course.
Welding Inspector Course
Safety officer course
Quality Management Course
Quality Management Course in India
Clinical sas training in chennai | SAS Training course chennai
ReplyDeleteI have to voice my passion for your kindness giving support to those people that should have guidance on this important matter.
Your new valuable key points imply much a person like me and extremely more to my office workers. With thanks; from every one of us.
ReplyDeleteBest PHP Training Institute in Chennai|PHP Course in chennai
Best .Net Training Institute in Chennai
Dotnet Training in Chennai
Dotnet Training in Chennai
Thanks for sharing the information
ReplyDeletesalesforce admin training
devops course
full stack network engineer training
Nice Post! Thank you for sharing very good post, it was so Nice to read and useful to improve my knowledge as updated one, keep blogging.
ReplyDeleteIt’s great to come across a blog every once in a while that isn’t
AWS training in chennai | AWS training in annanagar | AWS training in omr | AWS training in porur | AWS training in tambaram | AWS training in velachery
Unique information's are shared...The Quality of the contents are good...This helps me in lots of way
ReplyDeleteJava training in chennai | Java training in annanagar | Java training in omr | Java training in porur | Java training in tambaram | Java training in velachery
I liked your blog.Thanks for your interest in sharing your ideas.keep doing more
ReplyDeleteDevOps Training in Chennai | DevOps Training in anna nagar | DevOps Training in omr | DevOps Training in porur | DevOps Training in tambaram | DevOps Training in velachery
Thanks For Sharing The Information The information shared Is Very Valuable Please Keep Updating Us Time just went On reading The article
ReplyDeleteJava Training in Chennai
Java Training in Velachery
Java Training in Tambaram
Java Training in Porur
Java Training in Omr
Java Training in Annanagar
Nice Post! Thank you for sharing very good post, it was so Nice to read and useful to improve my knowledge
ReplyDeleteDigital Marketing Training in Velachery
Digital Marketing Training in Tambaram
Digital Marketing Training in Porur
Digital Marketing Training in Omr
Digital MarketingTraining in Annanagar
Superb. I really enjoyed very much with this article here. Really it is an amazing article I had ever read. I hope it will help a lot for all. Thank you so much for this amazing posts and please keep update like this excellent article. thank you for sharing such a great blog with us.
ReplyDeleteSoftware Testing Training in Chennai
Software Testing Training in Velachery
Software Testing Training in Tambaram
Software Testing Training in Porur
Software Testing Training in Omr
Software Testing Training in Annanagar
It is amazing and wonderful to visit your site. Thanks for sharing this information,this is useful to me... Top 10 Makeup Artists in Kolkata
ReplyDeleteNice Post !
ReplyDeleteAre you unable to work on QuickBooks software? If yes, then do call us at QuickBooks Technical Support 1-(855) 550-7546 and get sure-shot solutions to troubleshoot all the issues of QuickBooks.
Nice & Informative Blog !
ReplyDeleteyou may encounter various issues in QuickBooks that can create an unwanted interruption in your work. To alter such problems, call us at QuickBooks Customer Service Number 1-877-948-5867 and get immediate technical services for QuickBooks in less time.
Nice Blog !
ReplyDeleteQuickBooks is a top-rated accounting software that is designed to fulfill all the accounting needs of the business. In case you are facing QuickBooks Error 1904 on your screen.
how to logout of amazon app
ReplyDeleteThank you for sharing such valuable information. Your blog always provides a fresh perspective, and I find it both informative and enjoyable to read. Keep up the great work!" AWS Training in Pune
ReplyDeleteContact with IGCP to pursue your Clinical SAS Coaching in Hyderabad, and achieve your professional dreams.
ReplyDeleteThis was a very insightful and well-written post. I appreciate how clearly you explained everything. It’s fascinating how different areas are influenced by digital trends today. Digital Marketing plays a key role in this transformation. Digital Marketing Course in pune offers great opportunities for learners. A good Digital Marketing Institute in Pune provides practical exposure, and the Best Digital Marketing Institute ensures real understanding.
ReplyDeleteThis is a fantastic hands-on guide! I love how you broke down the Lex bot creation step by step. For anyone building the backend of such a conversational app, having a strong foundation in modern frameworks is essential. I recently completed spring boot developer course in Electronic City Bangalore which covered REST APIs and microservices – exactly what you'd need to connect a Lex frontend to a robust backend. Your tutorial on intents and slots is super clear. Pairing this with backend mastery would make anyone job-ready. Thanks for sharing such a detailed walkthrough!
ReplyDeleteThis is an incredible step-by-step guide, Ceyhun! The way you’ve explained creating intents like LogOut and SellACard with custom slot types makes Amazon Lex much less intimidating. For learners in Electronic City who want to get hands-on with building conversational interfaces, having a structured learning path is key. I found that pairing AI skills with data visualization tools is a great combination. You can explore the power bi training in electronic city bangalore with free demo to see how dashboards can complement voice-driven apps. Your tutorial on recording audio and handling confirmation prompts is pure gold. Has anyone here tried integrating Lex with a Lambda function for slot validation?
ReplyDeleteI found this article very helpful and engaging. The information was presented in a structured and reader-friendly manner, making it easy to absorb. Your expertise on the subject is evident throughout the post. Thank you for sharing such valuable insights and practical advice with your readers. top 10 university in world.
ReplyDeleteThis is an excellent article filled with useful information and practical recommendations. The content is well-researched, engaging, and easy to understand. I appreciate the effort you put into creating such valuable resources for readers. Thank you for sharing your expertise and helping others learn. top 10 university in world.
ReplyDelete