Showing posts with label EC2. Show all posts

Sunday, April 30, 2017

Storing User Sessions in Redis Using Amazon ElastiCache


In this series of posts, I am writing about various AWS services. In my last post, I have shown how to use S3 direct uploads for uploading the files to S3 from the browser.
The application I have developed for that post used HTTP sessions for session management. In this post, I will show how to use Redis to store user sessions when using many EC2 instances.
The Problem
By default, Spring Boot applications use HTTP sessions that are valid only in the JVM they are created. If we use only one EC2 instance for our application, the application works as expected. But if we use multiple EC2 instances behind an Elastic Load Balancer, one HTTP session created in an EC2 instance will not be valid if the subsequent request is handled by another EC2 instance.
The Solution
In a load balanced multi EC2 instance scenario, we should store the session information outside of the EC2 instances. There are different solutions like a database or an in-memory store.
Nowadays the best practice for storing session information is using an in-memory cache store like Memcached or Redis.
Amazon provides a managed in-memory data store called Amazon ElastiCache that can be used as a cache that is compatible with both Memcache and Redis.

For this post, I will use an ElastiCache Redis cluster with 1 node. The picture below shows the structure of the session management solution that I will use.


I will use the application in my previous post as a starting point. The code can be found here.

The steps for adding Redis as a session store are below.

1. Create the ElastiCache Redis cluster

2. Add dependencies

3. Configure Redis session store

4. Deploy the application

Let's start.


1. Create the ElastiCache Redis cluster

We can use the AWS ElastiCache CLI command below to create a Redis cluster with 1 node.

aws elasticache create-cache-cluster --cache-cluster-id CardStoreRedis --cache-node-type cache.t2.micro --engine redis --engine-version 3.2.4 --num-cache-nodes 1

By default, the cluster will use the default security group in the default VPC in the AWS region. To allow the EC2 instances to access Redis, we can enable the inbound traffic to default security group on 6379 port from the security group of EC2 instances by specifiying the security group of the EC2 instances as source with the command below.

aws ec2 authorize-security-group-ingress --group-name default --protocol tcp --port 6379 --source-group CardStoreSG

It will take some time to create Redis cluster. After it is created we can get the public address of the cache node with the command below.
aws elasticache describe-cache-clusters --cache-cluster-id CardStoreRedis --show-cache-node-info|grep Address

It should be like the address below.
cardstoreredis.XXXX.001.euc1.cache.amazonaws.com  


We will use this address to access Redis cache node from the application.

2. Add dependencies

Add Maven dependencies as below for Spring Session and Redis.

        <dependency>
                <groupId>org.springframework.session</groupId>
                <artifactId>spring-session</artifactId>
        </dependency>

        <dependency>
             <groupId>org.springframework.boot</groupId>
             <artifactId>spring-boot-starter-data-redis</artifactId>
        </dependency>

3. Configure Redis session store

To enable Redis as session store we use  @EnableRedisHttpSession annotation. By default Spring Boot Redis library will try to configure Redis Key Space Notifications for session deletion and expiration events but configuration requests from Redis clients are disabled in ElastiCache Redis clusters. We can configure the application in a way that it will not try to configure key space notifications by creating a ConfigureRedisAction.NO_OP instance as a bean. For more information, see here.

If you want to allow your Spring Boot application to use these session lifecycle events, you can set  notify-keyspace-events parameter by using custom Parameter Groups while creating your ElastiCache Redis Cluster. For more information, see here.

@EnableRedisHttpSession
public class RedisSessionConfig {
      
       @Bean
       public static ConfigureRedisAction configureRedisAction() {
           return ConfigureRedisAction.NO_OP;
       }
      
}

4. Deploy the application

After preparation, we can deploy the application to AWS.  We can create an ELB and an auto scaling group to use multiple EC2 instances.
We package the application and send the WAR to S3 with the commands below.
mvn package
aws s3 cp target/cardstore-0.0.1-SNAPSHOT.war s3://cardstoredeploy/

The Spring Boot application will read Redis cache node address from spring.redis.host variable. We can specify this value as a JVM system property when launching the JVM in EC2 init script like below.

#!/bin/bash
yum update -y
yum install java-1.8.0 -y
yum remove java-1.7.0-openjdk -y

mkdir /app

aws s3 cp --region eu-central-1 s3://cardstoredeploy/cardstore-0.0.1-SNAPSHOT.war /app/

java -Dspring.redis.host=cardstoreredis.XXX.0001.euc1.cache.amazonaws.com -Duser.activation.queue.name=XXX -Dmail.from.address=XXX -Duser.card.upload.s3.bucket.name=XXX -Duser.card.upload.s3.bucket.region=XXX -Duser.card.upload.s3.bucket.awsId=XXX -Duser.card.upload.s3.bucket.awsSecret=XXX -jar /app/cardstore-0.0.1-SNAPSHOT.war

We can create and configure ELB with the commands below.

aws elb create-load-balancer --load-balancer-name CardStoreLB --listeners "Protocol=HTTP,LoadBalancerPort=8080,InstanceProtocol=HTTP,InstancePort=8080" --security-groups sg-8567a2ee --availability-zones eu-central-1a
aws elb configure-health-check --load-balancer-name CardStoreLB --health-check Target=TCP:8080,Interval=5,UnhealthyThreshold=2,HealthyThreshold=2,Timeout=2

Then, we can create the launch configuration and the auto scaling group using the commands below.

aws autoscaling create-launch-configuration --launch-configuration-name CardStoreLC --key-name CardStoreKP --image-id ami-af0fc0c0 --instance-type t2.micro --user-data file://cardstore_ec2_init_script.txt --security-groups sg-8567a2ee  --iam-instance-profile CardStoreRole

aws autoscaling create-auto-scaling-group --auto-scaling-group-name CardStoreASG --launch-configuration-name CardStoreLC --load-balancer-names CardStoreLB --min-size 2 --max-size 2 --termination-policies "OldestInstance"  --availability-zones eu-central-1a


With this commands we have created 2 EC2 instances that are load balanced. After you logged in to the application at the load balancer address and 8080 port, you can refresh the dashboard page to make sure that the requests are distributed to the both instances. If you are not directed to the login page and still see the dashboard page,  that means both instances can access the session information from Redis cache node. You can tail the cloud-init-output.log files of the instances with the command below to be sure that both instances are receiving requests.
tail -200f /var/log/cloud-init-output.log


Summary

When using multiple EC2 instances, we should store the session information outside of the EC2 instances. In this post, I have shown how to use Amazon ElastiCache to create and use a Redis cache cluster for storing user session information. The code can be found here.


Tuesday, April 18, 2017

Adding User Activation Functionality by Using Amazon Simple Queue Service and Amazon Simple Email Service


In this series of posts, I am writing about various AWS services. In my previous posts, I have written about AWS EC2, ELB, Auto Scaling and DynamoDB.

As I said in my last post, this post will be about adding a user activation functionality to our digital card store application.

In that post, I have added User and Card DynamoDB tables to hold user and card information. When a new user is registered, the user was able to use the application immediately.

For this post, I will add an additional step to user registration process to make sure that no fake user is registered in our application. Before activation users will not be allowed to log in.

The User Activation Process

To make the mail sending process is independent from user registration request, I will use a message queue. Amazon Simple Queue Service is used to send and receive messages.

We can use Amazon Simple Email Service to send and receive email messages.

Activation process is shown below. When the user is registered, user information is persisted into DynamoDB and an activation message is put into the user activation queue. The application receives the message from the queue and sends the activation mail to the user.


When the user received the message, clicks the activation link in the message. Application process the activation request and marks the user as active in DynamoDB as shown below.


Steps

1. Prepare the queue in SQS
2. Verify the sender email address in SES
3. Change the application.
4. Start EC2 instances with SQS and SES permissions

Let's start.

1. Prepare the queue in SQS

Before sending messages to the queue, we should create the queue. Using the command below, we can create the queue with AWS CLI.

aws sqs create-queue --queue-name MailsToSendForUserActivation --attributes VisibilityTimeout=600
{
    "QueueUrl": "https://eu-central-1.queue.amazonaws.com/XXXX/MailsToSendForUserActivation"
}

Now we are ready to use the queue.
                 
2. Verify the sender email address in SES

Before using Amazon Simple Email Service, you should verify your sender email address. You can verify your email address using the steps below.
  • Sign in to the AWS Console. Under AWS Services choose SES
  • Select Email Addresses from the navigation pane and then click Verify a New Email Address.
  • Enter your email address and click Verify This Email Address.
Amazon Simple Email Service will send a verification email to the address. The verification link will be active 24 hours. When you click the verification link, the email address is verified.

New AWS users are allowed to use Simple Email Service in a limited environment for security reasons. This limited environment is called SES Sandbox. In SES Sandbox, you can only send email to the verified email addresses. To use Simple Email Service for production, you should open a ticket to AWS Support.

After the verification is done, you can send email to the verified email addresses.

3. Change the application

To show how to use SQS and SES, I will use the digital card store application that I have used in my previous post. The code can be found at my GitHub repository.

To use SQS and SES, we should change our applicaton as shown below.

a. Add dependencies

Amazon SQS Java Messaging Library is a Java JMS implementation for accessing Amazon SQS. We will use this library with Spring JMS. Also we will use aws-java-sdk-ses library to access Amazon SES.

             <dependency>
                    <groupId>org.springframework</groupId>
                    <artifactId>spring-jms</artifactId>
             </dependency>
             <dependency>
                    <groupId>com.amazonaws</groupId>
                    <artifactId>aws-java-sdk</artifactId>
                    <version>1.9.6</version>
             </dependency>
             <dependency>
                    <groupId>com.amazonaws</groupId>
                    <artifactId>amazon-sqs-java-messaging-lib</artifactId>
                    <version>1.0.0</version>
                    <type>jar</type>
             </dependency>
             <dependency>
                    <groupId>com.amazonaws</groupId>
                    <artifactId>aws-java-sdk-ses</artifactId>
                    <version>1.9.6</version>
             </dependency>

b. Configure SQS

We configure Spring JMS to use SQSConnectionFactory as shown below. You can change your region accordingly.

@Configuration
@EnableJms
public class SQSConfig {
       SQSConnectionFactory connectionFactory = SQSConnectionFactory.builder()
                    .withRegion(Region.getRegion(Regions.EU_CENTRAL_1))
                    .withAWSCredentialsProvider(new DefaultAWSCredentialsProviderChain()).build();

       @Bean
       public DefaultJmsListenerContainerFactory jmsListenerContainerFactory() {
             DefaultJmsListenerContainerFactory factory = new DefaultJmsListenerContainerFactory();
             factory.setConnectionFactory(this.connectionFactory);
             factory.setDestinationResolver(new DynamicDestinationResolver());
             factory.setConcurrency("3-10");
             factory.setSessionAcknowledgeMode(Session.CLIENT_ACKNOWLEDGE);

             return factory;
       }

       @Bean
       public JmsTemplate defaultJmsTemplate() {
             return new JmsTemplate(this.connectionFactory);
       }
}

After configuration is done, we can create a simple service to send messages to the queue.

@Service
public class SQSService {
       @Autowired
       protected JmsTemplate defaultJmsTemplate;

       public void sendMessage(String queueName, String messageBody) {
             defaultJmsTemplate.convertAndSend(queueName, messageBody);
       }
}

b. Configure SES

We configure SES  as shown below. You can change your region accordingly. Please note that SES is not available in every region, so you might use a different region than you used with other services.

@Configuration
public class SESConfig {
       @Value("${mail.from.address}")
       String mailFromAddress;

       @Bean
       public AmazonSimpleEmailService amazonSimpleEmailService() {
             AmazonSimpleEmailService client = new AmazonSimpleEmailServiceClient();
             client.setRegion(Region.getRegion(Regions.EU_WEST_1));
             return client;
       }

       public String getFromAddress() {
             return mailFromAddress;
       }
}

After configuration we can create a simple service to send email.

@Service
public class SESService {
       @Autowired
       SESConfig sesConfig;

       public void sendMessage(String to, String subject, String body) {
             Destination destination = new Destination().withToAddresses(to);
             Content subj = new Content().withData(subject);
             Content bdy = new Content().withData(body);

             Message message = new Message().withSubject(subj).withBody(new Body().withHtml(bdy));
             SendEmailRequest request = new SendEmailRequest().withSource(sesConfig.getFromAddress())
                           .withDestination(destination).withMessage(message);
             sesConfig.amazonSimpleEmailService().sendEmail(request);
       }
}

c. Change User class

We add activationStatus and activationToken fields to User class as shown below.

@DynamoDBTable(tableName = "User")
public class User {
       public static final String ACTIVATION_STATUS_NONE = "NONE";
       public static final String ACTIVATION_STATUS_MAIL_SENT = "MAIL_SENT";
       public static final String ACTIVATION_STATUS_DONE = "DONE";

       @DynamoDBHashKey
       private String username;

       private String name;
       private String password;
       private String email;
       private double balance;
       private String activationStatus = ACTIVATION_STATUS_NONE;
       private String activationToken;

c. Change UserController class

We add userActivationQueueName, sqsService and sesService fields as shown below.

@Controller
public class UserController {

       public static final String USER_KEY_FOR_SESSION = "USER";

       @Autowired
       UserRepository userRepository;

       @Value("${user.activation.queue.name}")
       String userActivationQueueName;

       @Autowired
       SQSService sqsService;

       @Autowired
       SESService sesService;

We change registerUser to call prepareForActivation as shown below.

@RequestMapping(value = "/users", method = RequestMethod.POST)
@ResponseBody
public boolean registerUser(@RequestBody User user, HttpServletRequest request) {

       User previous = userRepository.findOne(user.getUsername());

       if (previous == null) {
             prepareForActivation(user, makeActivationUrlFromRequest(request, "/users"));

             user.setBalance(100);
             userRepository.save(user);
       }

       return previous == null;
}

We add prepareForActivation to generate a user activation token and send activation message to the queue as shown below.

private String makeActivationUrlFromRequest(HttpServletRequest request, String suffixToReplace) {
       return request.getRequestURL().toString().replace(suffixToReplace, "/activate");
}

private void prepareForActivation(User user, String url) {
       user.setActivationToken(String.valueOf(100000 * Math.random()));

       sqsService.sendMessage(userActivationQueueName,
                           "{\"username\": \"" + user.getUsername() + "\", \"activationUrl\":\"" + url + "\"}");
}

We add handleUserActivationMailMessage to listen queue messages and send activation emails as shown below.

@JmsListener(destination = "${user.activation.queue.name}")
public void handleUserActivationMailMessage(String json) {
       try {
             ObjectMapper mapper = new ObjectMapper();

             Map<String, String> data = mapper.readValue(json, Map.class);

             String username = data.get("username");
             String activationUrl = data.get("activationUrl");

             User existing = userRepository.findOne(username);

             if (existing != null && !existing.getActivationStatus().equals(User.ACTIVATION_STATUS_DONE)) {
                    System.out.println("Sending activation mail for user " + username);

                    sendActivationMailForUser(existing, activationUrl);

                    existing.setActivationStatus(User.ACTIVATION_STATUS_MAIL_SENT);
                    userRepository.save(existing);
             }
       } catch (Exception ex) {
             throw new RuntimeException("Encountered error while processing user activation message.", ex);
       }
}

private void sendActivationMailForUser(User user, String activationUrlBase) {

       String activationUrl = activationUrlBase + "?username=" + user.getUsername() + "&token="
                           + user.getActivationToken();

       String to = user.getEmail();
       String subject = "Activate your Digital Card Store account";
       String body = "<html><body><br/>" + "Dear " + user.getName() + "<br/>" + "<a href=\"" + activationUrl
                    + "\">Please click to activate your user account " + user.getUsername() + "</a><br/>"
                    + "</body></html>";

       sesService.sendMessage(to, subject, body);
}

We add activateUser as shown below. This method will be called when a user is clicked the activation link in the activation email.

@RequestMapping("/activate")
public String activateUser(Map<String, Object> model, @RequestParam("username") String username,
             @RequestParam("token") String token) {

       User user = userRepository.findOne(username);

       if (user == null)
             model.put("result", "User not found: " + username);
       else if (user.getActivationStatus().equals(User.ACTIVATION_STATUS_DONE))
             model.put("result", "User " + username + " already activated.");
       else if (!user.getActivationToken().equals(token))
             model.put("result", "Activation token for user " + username + " is not correct.");
       else {
             user.setActivationStatus(User.ACTIVATION_STATUS_DONE);
             userRepository.save(user);
             model.put("result", "User " + username + " activated successfully.");
       }
       return "activationResult";
}

4. Start EC2 instances with SQS and SES permissions

When we deploy our application to the EC2, we should start EC2 instances with an IAM role that have AmazonSQSFullAccess and  AmazonSESFullAccess permissions.

Also we should give mail.from.address and user.activation.queue.name parameters accordingly. We can use EC2 instance tags and init scripts to set these parameters.

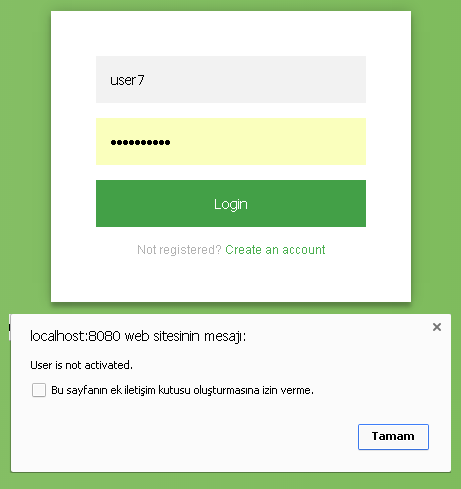
After we deploy our application, the activation process will be enabled. After an user is registered, registration emails are sent to the user. Users will be allowed to login only after activation. Activation can be done by clicking activation link in the mail. You can use the application like the screenshots below.


Summary

In this post, I have added user activation process to prevent fake users. I have used Amazon SQS queues to send and receive messages. To send emails Amazon SES is used. The code can be found at my GitHub repository.

In my next posts, I will continue to use various AWS services to add functionality to my digital card store application.