In this series of posts, I am writing about various AWS
services. In a previous post,
I have shown how to use Amazon Simple Queue Service and Amazon Simple Email
Service to send an activation mail when a user is registered.
The application I have developed for that post used SQS
to send a message to the activation queue and a queue listener is processed the
messages for sending activation mails to users by using SES.
AWS Lambda is very popular
nowadays. Using the serverless architecture, we can focus only on business
needs and the rest is handled by AWS. But when we start to use a few Lambda
functions together, it starts to get harder and harder to manage the functions and
understand the data flow between them.
AWS Step Functions is very useful in simplifying distributed Lambda
executions. While seeing steps visually when designing the flow provides easy
understanding, having state and ability to retry is very valuble for
distributed execution coordination.
In this post, I will use DynamoDB triggers instead of SQS
for sending an activation mail. When a User item is inserted to DynamoDB User
table, table's trigger executes a Lambda function. Lambda function then generates
a new Step Function execution for generating mail and sending it. The process
is shown in the picture below.

Steps
1. Prepare IAM Roles
2. Implement LF_CardStore_GetUserActivationStatus Lambda Function
3. Implement LF_CardStore_SendUserActivationMail Lambda Function
4. Create the SF_CardStoreSendUserActivationMail Step Function.
5. Create LF_CardStore_UserTableTriggerToSendActivationMail Function for User
Table
Trigger
6. Configure DynamoDB User Table Trigger
7. Change the Application
As a starting point, I will use the code I have developed
for my previous post. The code can be found here.
Application is developed in Java using Spring Boot. For this
post, I will use Node.js to implement Lambda functions easily.
Let's start.
1. Prepare IAM Roles
For our Lambda Functions to call DynamoDB and Simple
Email Service (SES), we create a new IAM Role with AmazonDynamoDBFullAccess, AmazonSESFullAccess
named CardStoreLambdaRole.
For step functions, we create a role named CardStoreStepFunctionsRole. For more
information on creating IAM roles for step functions, see here.
2. Implement LF_CardStore_GetUserActivationStatus Lambda
Function
The code for LF_CardStore_GetUserActivationStatus is
below. DynamoDB client is created in initialization part and user is queried by
username from User table in handler. If user is found, activationStatus field is returned, otherwise an empty string is returned.
In a production usage, we should handle error conditions, for more information
see here.
var aws = require('aws-sdk');

var docClient = new aws.DynamoDB.DocumentClient();

var table = "User";

exports.handler = (event, context, callback) => {
    var username = event.username;
    var activationStatus = "";

    if (!username || username === "") {
        callback(null, activationStatus);
        return;
    }

    var params = {
        TableName: table,
        Key: {
            "username": username
        }
    };

    docClient.get(params, function(err, data) {
        if (err) {
            console.error("Unable to read item. Error JSON:", JSON.stringify(err, null, 2));
            callback(null, activationStatus);
        } else {
            console.log("GetItem succeeded:", JSON.stringify(data, null, 2));

            var user = data.Item;
            activationStatus = user == null ? "" : user.activationStatus;

            callback(null, activationStatus);
        }
    });
};
After putting this Node.js code in zip file, we can
create the Lambda Function with the command below. Replace AWS_ACCOUNT_ID with
your AWS Id.
aws lambda create-function \
--function-name LF_CardStore_GetUserActivationStatus \
--description "Returns activation status of
user" \
--runtime nodejs6.10 \
--handler LF_CardStore_GetUserActivationStatus.handler \
--zip-file fileb://LF_CardStore_GetUserActivationStatus.zip
\
--role arn:aws:iam::AWS_ACCOUNT_ID:role/CardStoreLambdaRole
Once created, we can test the Lambda
function like below. In this sample, activation status of user20 was DONE.
aws lambda invoke \
--function-name LF_CardStore_GetUserActivationStatus \
--payload '{"username":"user20"}' \
out.txt
cat out.txt
"DONE"
3. Implement LF_CardStore_SendUserActivationMail Lambda
Function
The code for LF_CardStore_SendUserActivationMail
is below. In initialization part, we init SES and DynamoDB clients. SES service
is not available in every region, so use a region close to you and configure it
like below.
Handler first tries to find the user. If user found, it
checks the activationStatus of the
user and sends the mail if not already sent. After sending the mail, activationStatus of user is marked as MAIL_SENT.
Please note that the function uses activationUrlBase field of User table to generate final activation url. This is required for Lambda
function to work when Java application is run in both development environment
and on AWS. The Java program generates the base url according to the
environment and saves to the User table.
Also
From field of the mails is specified with FROM_ADDRESS
environment variable.
var aws = require('aws-sdk');

var ses = new aws.SES({
    region: 'eu-west-1'
});

var docClient = new aws.DynamoDB.DocumentClient();

var table = "User";
var fromAddress = process.env.FROM_ADDRESS;

function markActivationStatus(username, activationStatus, callback) {
    var params = {
        TableName: table,
        Key:{
            "username": username
        },
        UpdateExpression: "set activationStatus = :status",
        ExpressionAttributeValues:{
            ":status": activationStatus
        },
        ReturnValues:"UPDATED_NEW"
    };

    console.log("Updating the item...");
    docClient.update(params, function(err, data) {
        if (err) {
            console.error("Unable to update item. Error JSON:", JSON.stringify(err, null, 2));
            callback(null, {"result": "Can't mark activationStatus: " + JSON.stringify(err, null, 2)})
        } else {
            console.log("UpdateItem succeeded:", JSON.stringify(data, null, 2));
            callback(null, {"result": "OK"})
        }
    });
}

function sendEmail(user, activationUrlBase, callback) {

    var activationUrl = activationUrlBase + "?username=" + user.username + "&token=" + user.activationToken;

    var to = user.email;
    var subject = "Activate your Digital Card Store account";
    var mailBody = '<html><body><br/>Dear ' + user.name + '<br/><a href="' + activationUrl
    + '">Please click to activate your user account ' + user.username + "</a><br/>"
    + "</body></html>";

    var eParams = {
        Destination: {
            ToAddresses: [to]
        },
        Message: {
            Body: {
                Html: {
                    Data: mailBody
                }
            },
            Subject: {
                Data: subject
            }
        },
        Source: fromAddress
    };

    console.log('>>> SENDING EMAIL');
    var email = ses.sendEmail(eParams, function(err, data){
        if (err) {
            console.log(err);
            callback(null, {"result": "Can't send email:" + err});
        }
        else {
            console.log(">>> EMAIL SENT");
            markActivationStatus(user.username, "MAIL_SENT", callback);
        }
    });
}

function findUser(username, callback) {
    var params = {
        TableName: table,
        Key:{
            "username": username
        }
    };

    docClient.get(params, function(err, data) {
        if (err) {
            console.error("Unable to read item. Error JSON:", JSON.stringify(err, null, 2));
            callback(null, {"result": "Unable to read item. Error JSON:" + JSON.stringify(err, null, 2)});
        } else {
            console.log("GetItem succeeded:", JSON.stringify(data, null, 2));

            var user = data.Item;
            var activationStatus = user == null ? "" : user.activationStatus;
            var activationUrlBase = user == null ? "" : user.activationUrlBase;

            if (activationStatus === "NONE")
                sendEmail(data.Item, activationUrlBase, callback);
            else
                callback(null, {"result": "Activation status of user " + username + " is not appropriate. It is " + activationStatus});
        }
    });
}

exports.handler = (event, context, callback) => {
    console.log("Incoming: ", event);

    var username = event.username;

    findUser(username, callback);
};
After putting this Node.js code in zip file, we can
create the Lambda Function with the command below. Replace AWS_ACCOUNT_ID with
your AWS Id and specify mail sender address with FROM_ADDRESS environment
variable.
aws lambda create-function \
--role
arn:aws:iam::520334389080:role/CardStoreLambdaRole \
--function-name
LF_CardStore_SendUserActivationMail \
--description "Send activation mail
to the user" \
--runtime nodejs6.10 \
--handler
LF_CardStore_SendUserActivationMail.handler \
--zip-file
fileb://LF_CardStore_SendUserActivationMail.zip \
--role arn:aws:iam::AWS_ACCOUNT_ID:role/CardStoreLambdaRole
\
--environment Variables={FROM_ADDRESS=sender@app.com}
\
Once created, we can test the Lambda function like below.
In this sample, because the activation status of user20 was DONE, mail is not
sent.
aws lambda invoke \
--function-name LF_CardStore_SendUserActivationMail \
--payload '{"username":"user22"}' \
out.txt
cat out.txt
{"result":"Activation status of user
user22 is not appropriate. It is DONE"}
When we test with another user, mail
is sent.
aws lambda invoke \
--function-name LF_CardStore_SendUserActivationMail \
--payload '{"username":"user23"}' \
out.txt
cat out.txt
{"result":"OK"}
We can see the Lambda functions in
AWS Console like the picture below.

4. Create the SF_CardStoreSendUserActivationMail Step
Function.
Now, we are ready to create the step function that use the
Lambda functions created. The Amazon JSON language for defining the step
function is below. Replace AWS_ACCOUNT_ID with your AWS Id.
{
  "Comment": "Step function to send user activation mail",
  "StartAt": "GetActivationStatus",
  "States": {
    "GetActivationStatus": {
      "Type": "Task",
      "Resource": "arn:aws:lambda:eu-central-1:AWS_ACCOUNT_ID:function:LF_CardStore_GetUserActivationStatus",
      "Next": "CheckActivationStatus",
      "ResultPath": "$.activationStatus"
    },
    "CheckActivationStatus": {
      "Type" : "Choice",
      "Choices": [
        {
          "Variable": "$.activationStatus",
          "StringEquals": "NONE",
          "Next": "SendActivationMail"
        }
      ],
      "Default": "MailSent"
    },
    "SendActivationMail": {
      "Type" : "Task",
      "Resource": "arn:aws:lambda:eu-central-1:AWS_ACCOUNT_ID:function:LF_CardStore_SendUserActivationMail",
      "Next": "MailSent"
    },
    "MailSent": {
      "Type": "Pass",
      "End": true
    }
  }
}
After saving this code to SF_CardStore_SendUserActivationMail.js
file, we can create the step function with the command below. Replace AWS_ACCOUNT_ID
with your AWS Id.
aws stepfunctions create-state-machine \
--name SF_CardStore_SendUserActivationMail \
--role-arn arn:aws:iam::AWS_ACCOUNT_ID:role/ CardStoreStepFunctionsRole \
--definition "$(cat
SF_CardStore_SendUserActivationMail.js)"
We can see the step function in the
console like below.
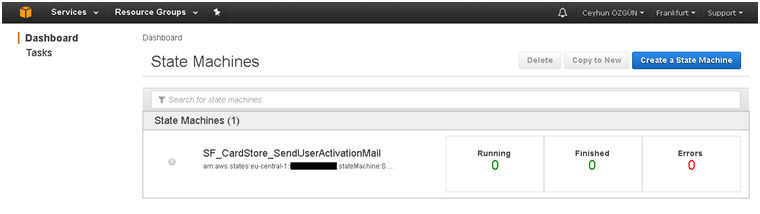
Steps for the step function can be
seen like the picture below.

The flow is explained below.
1. Step function starts at GetActivationStatus task. This
task is implemented by calling LF_CardStore_GetUserActivationStatus
Lambda function. username parameter is expected to be
exist in the parameter given when starting the step function execution. Input
parameter is passed to the function as is. Result of the function is put to the
step machine data with the name activationStatus by
"ResultPath":
"$.activationStatus"
expression. The result will be checked in next step by
using this field name. For more information on input and output management for
steps, see here.
The next step is specified with "Next": "CheckActivationStatus" expression.
2. Next step is CheckActivationStatus. The type of this
step is Choice. In this step result of the LF_CardStore_GetUserActivationStatus
Lambda function is checked. If the activation status of
the user is "NONE", SendActivationMail step is executed. Otherwise, MailSent step is executed, which means the end of the step
function and mail is not sent.
3. SendActivationMail step is executed conditionally. This
step calls LF_CardStore_SendUserActivationMail. Input parameter username is passed as is. The next step
is MailSent, which
means the end of the step function.
4. MailSent step is marked as the end of the step function.
We can start a new execution with the command below.
Replace AWS_ACCOUNT_ID with your AWS Id.
aws stepfunctions start-execution \
--state-machine-arn arn:aws:states:eu-central-1:AWS_ACCOUNT_ID:stateMachine:SF_CardStore_SendUserActivationMail
\
--input '{"username":"user22"}'
We can see the
flow of the execution by clicking the execution in the console. We can see the
executed steps with the green color. In this case, SendActivationMail step is
not executed and mail is not sent.

We try
another user and this time mail is sent by executing SendActivationMail step like
below.

Now our step function is ready for
sending activation mails.
5. Create
LF_CardStore_UserTableTriggerToSendActivationMail Function for User Table
Trigger
The code for the trigger is below. When a record is
inserted, deleted or updated our handler will be called. Handler may be called
for more than one record, so we loop over event.Records.
event.Records[i].dynamodb.NewImage will contain the record inserted. For more
information, see here.
We want to send activation mails only when a new record
is inserted. Thus we check whether the value of event.Records[i].eventName is
"INSERT".
After user name is extracted, we start a new execution by
using AWS.StepFunctions API. Step function ARN is retrieved from environment
variable. We pass the username of the record as username parameter to the step
function.
const AWS = require('aws-sdk');

var stepFunctionArn = process.env.STEP_FUNCTION_ARN;

function startSendUserActivationMailStepFunctionExecution(username, callback) {
  console.log("Starting SendUserActivationMail StepFunction Execution for user " + username);

  const stepfunctions = new AWS.StepFunctions();
  const params = {
    stateMachineArn: stepFunctionArn,
    input: JSON.stringify({ "username": username })
  };

  // start a state machine
  stepfunctions.startExecution(params, (err, data) => {
    if (err) {
      callback(err, null);
      return;
    }

    console.log(data);

    callback(null, 'Started SendUserActivationMail StepFunction Execution for user ' + username);
  });
}


exports.handler = (event, context, callback) => {
    console.log('Received event:', JSON.stringify(event, null, 2));
    event.Records.forEach((record) => {
        console.log(record.eventName);
        console.log('DynamoDB Record: %j', record.dynamodb);

        if (record.eventName === "INSERT") {
            var username = record.dynamodb.NewImage.username;

            if (username)
                startSendUserActivationMailStepFunctionExecution(username.S, callback);
        }
    });
};
After saving the code to file and zip the file, we can
create the Lambda function with the command below. Replace AWS_ACCOUNT_ID with
your AWS Id.
$ aws lambda create-function \
--function-name
LF_CardStore_UserTableTriggerToSendActivationMail \
--description "User Table trigger for starting
SF_CardStore_SendUserActivationMail execution" \
--runtime nodejs6.10 \
--handler LF_CardStore_UserTableTriggerToSendActivationMail.handler
\
--zip-file
fileb://LF_CardStore_UserTableTriggerToSendActivationMail.zip \
--role
arn:aws:iam::AWS_ACCOUNT_ID:role/CardStoreLambdaRole \
--environment
Variables={STEP_FUNCTION_ARN=arn:aws:states:eu-central-1:AWS_ACCOUNT_ID:stateMachine:SF_CardStore_SendUserActivationMail}
Now we are ready to attach this
trigger to the User table.
6. Configure DynamoDB User Table Trigger
To attach a trigger to User table, first we should enable
DynamoDB streams on the table. This way when the table is modified by any
insert, update or delete action, a new record is added to the stream. We can
attach a Lambda trigger to this stream. For more information, see here.
Go to DynamoDB console and select User table. Click
Manage Stream and select New image for View type and click Enable as shown in
the picture below.

Next, in the
Triggers tab, click Create trigger button. Select Existing Lambda Function from
menu. Select LF_CardStore_UserTableTriggerToSendActivationMail from Function
combo, enter 1 as Batch size and check Enable trigger checkbox, then click
Create to create trigger.

Now, User table trigger is
configured.
7. Change the Application
For the whole mechanism to work, we should change our Java application to add activationBaseUrl field to User table record when
creating a user.
Also we remove the SQS and SES dependencies from the
application because activation mail will be sent by the Lambda function.
Final code can be found at my GitHub repository.
After running the application, the activation mail will
be sent by the step function triggered by DynamoDB when a new user is
registered.
Summary
In this post, I have shown how to create a serverless
user activation mechanism by using AWS services. The mechanism is triggered by
DynamoDB trigger and is implemented using step functions. Lambda functions is
used for getting activation status and sending mail. The code can be found in
my GitHub repository.
I will continue to use various AWS services and blogging
about them.

